ARRL Field Day 2016

On your mark… Get set… GO!!

I didn’t know what to expect from Field Day, but I was excited at the prospect of being able to tune around on HF and check out some nice radios. I got to play with a Flex Software Defined Radio (I’m not sure what model), a really real HF radio on 80 meters and 40 meters, listened to the CW station and got to see FSK digital mode in action. The other guys told me that this was a pretty tame year, which I think really worked out in my favor. I got to spend some time with the radios without feeling rushed, but still had patient and knowledgeable supervision around for guidance.

I met several people that I haven’t even seen at meetings and had some fun conversation with other new hams. I hope to run into them at the next meeting (or maybe on the air!). I had a great time and it was nice to finally get to spend time with the older guys from the club. I had to leave after just a few hours though and didn’t get to make any QSOs myself, though I did get to help another ham by logging for him.

Late night HF and CW

After the engagement that I had to leave field day for, I got to come back for the late night session. I ran into my friend Scott, KF5ZRZ, and his family and talked with them for awhile. Then I made it to the primary operations room to find just 3 hams. Milos, KA5QMA I think, was working CW and racking up points for the club, while Bob and another ham were lurking around the HF rig.

I sat with Milos for awhile and listened to the stream of morse code pouring from the rig he was stationed at. It was a simple setup. Just a radio, an iambic key and a computer for logging contacts. He was brilliant. One after another he pulled contacts from the stream and logged them. He seemed to me to be very efficient at this. We talked some between contacts and I learned that he spends quite a lot of time on HF sending and copying CW. This really lit a fire in me to practice practice practice! I want to be like Milos!!

The 2 meter and 6 meter was setup on the Flex SDR and was right next to the CW rig. So while I was talking with Milos, I was also tuning around on VHF to no avail. 6 meters was closed and 2 meters was quite. I picked up a couple late night nets, but didn’t want to interupt for a quick QSO.

Then it was finally time for HF. I’ll admit I was a little nervous. They had a base station with a lot of buttons and a big dial and boxes connected to other boxes a whole lot of stuff that I didn’t understand. But, in the spirit of Field Day and The Hobby, I dove right in. I think they had the antenna tuned up for 80m and they were operating SSB. I’ve read about both, but never tried either. Finally, here was my chance. I had watched for a little earlier in the day, so I kinda knew what was going on. I started idly tuning around the band, picking up faint signals here and there, but nothing I could really work. I tried to answer a couple of CQs, but didn’t hear back. Our NVIS antenna seemed to be having some trouble getting out. I kept tuning. Finally here comes a CQ loud and clear… so I answer, “Whiskey five kilo alpha, whiskey five kilo alpha!” I’d been running over the neumonics in my head just for this. I felt like it came out pretty confident. I suppose it did. They called back for details. Crap! What now?! I hadn’t prepared for this! The other guys saw my befuddlement and jumped in telling me to finish the contact. Oh yeah. I knew that. “Whiskey 5 kilo alpha, 3 alpha, South Texas.” I did it. I made my first contact. I was so proud. I had just gotten a logged contact for my club. Yay me!

Unfortunately, just as I was tuning this station, Val calls that she’s here to pick me up. I convinced her to wait explaining that I’d just tuned a strong station and was about to make my first contact. It only took a few minutes, so it wasn’t a big deal. But then she got to here about it all the way home while I tried to explain to her why it was so exciting. I think maybe she got it. At least a little bit. Oh well. Time for bed.

A slow finish and 6m finally opens

Asleep at 3:00 am and somehow fully awake and on my way out the door by 7:00. I guess I still had a little buzz from that late night QSO. I woke up, jumped out of bed and pulled my pants on. I was out the door in just a few minutes and heading to the American Red Cross building. When I arrived there were a few more folks there, but there still wasn’t a lot going on. Jeff, N5MNW, was back at the Flex SDR tuning around on 2m, 6m and now 15m. The CW station was no longer active, but Lew had his digital station up an running. And of course, Bob and Stuart were over at the HF station. Jeff reported that the VHF/UHF bands — particularly 6m — was still not really open, but he’d made a few contacts. I had never seen any of the digital modes operating, so I sat down with Lew, W5IFQ, for a demo and discussion. It’s pretty cool stuff and I may get into it a little bit later, but it still doesn’t hold the romance of the HF SSB for me. He told me about using it on naval ships — with his own antennas — to stay in touch with his wife via regular email. That’s pretty cool info since I don’t know if I’ll ever convince Val to get her license :-).

Now it was time to wander back over to the HF station to attempt to get our 5 QRP contacts. Stuart, K5KVH, and I both had headphones while he tuned and I logged. I had a great time tuning around with him and helping pick out the station callsigns and contest info while we tried to work the different stations that we came across.

(Post unfinished, but I wanted to post something)

Testing the Pixie II

It’s Alive!

Chinese Pixie II
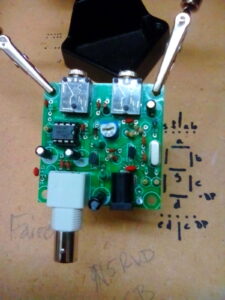
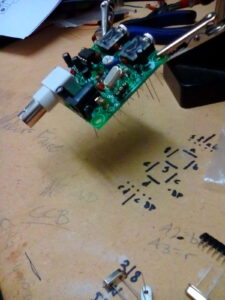
My new Chinese Pixie II fully assembled and nestled in it’s Altoids tin enclosure.

Okay! I just got to test the receive part of the Pixie II… and it worked!! This is the first fixed frequency radio I’ve ever built or even heard, so I have no basis for comparison, but I can tell you that it worked and that is very exciting for me. I thought it was cool when I built a little ground plane antenna for 2m and then a 5/8 wave whip for my 2m radio, but this is really something. I know I didn’t design the radio, but just the idea that I built it from a bag of parts, put it in an Altoids tin, hooked it up to a dipole antenna that I made from some speaker wire, and heard real, live CW is amazing! To me, this is what ham radio is about. And I can’t wait to finish my next radio project of redesigning and building a variation of the qrpme.com’s Sea Sprite (which is just an improvement on the Pixie II).

Testing Different Frequencies

I went through the crystals from the 8-pack (plus the one that came with the Pixie II) and picked up transmissions on 7.030, 7.040, 7.050, 7.070 and 7.110. The first 2 probably came through the clearest, but 7.110 came through well enough for me to catch some if it. And that’s important since it’s the novice frequency and will probably be the frequency I call on first. There’s a good reference for QRP at QRP Portal. Here’s the calling frequencies chart from their site:

40m
7.003
CW
(Japan, daytime only!)
7.028
CW
VK VK3YE
7.030
CW
(Europe) AC6V, ARRL, GQRP, K3WWP, NJQRP, RU-QRP, VK3YE
7.035
CW
(QRP-L) AC6V
7.040
CW
(US) AC6V, ARRL, K3WWP, NJQRP, VK3YE — now moving to 7.030
7.060
CW
(Europe) AC6V, NJQRP
7.090
SSB
(Europe) GQRP, NJQRP, RU-QRP
7.110
CW
US Novice AC6V, ARRL, K3WWP, NJQRP
7.285
SSB
AC6V, ARRL, NJQRP

So 3 out of 5 are primarily CW frequencies, 7.070 is PSK31 for regions 1 and 2, and I guess 7.050 is CW and digital modes. While I was able to pick up some transmissions, boy was that confusing! It’s going to really take some work to pick out a single station. They’re all stacked on top of each other! I probably heard 4 or 5 different stations on every frequency I picked up. Fortunately for me, I built a little 1/2 watt audio amplifier I built a little while back that worked great with the Pixie II. Though I was able to hear the stations with regular headphones, the amplifier really helped to pick out the individual stations.

Now I just need to find the time to finish learning CW and play with my new toy. I think a CW decoder may be in order for practice.

Chinese Pixie II 40m QRP Kit

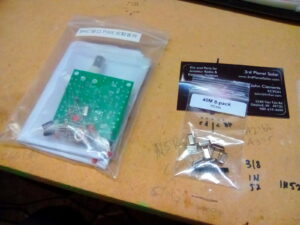
My Chinese Pixie II 40 meter QRP kit and 40m crystal set finally arrived!

The Pixie II 40m CW QRP kit and 40m crystal QRP calling 8-pack that I ordered from EBay just arrived in the mail! I can’t wait to be done with work so I can get started assembling it! Unfortunately, I’m self employed so I work ridiculous hours pretty much every day. Boo.

I ordered a 40m crystal 8-pack (pictured below) to get the major US 40m QRP calling frequencies. I was glad to find that it came with a SIP socket strip to use for the crystal socket. And I still have to figure out an antenna for it. I think something like the doublet dipole out of speaker wire, but I’m not sure how to connect it to BNC. I’ll probably end up using a simple wire connector since I don’t plan to use coaxial cable.

Pixie II and 40m crystal set
This is what came in the mail today! My new Chinese Pixie II 40m QRP and 40m crystal set
The complete Pixie II packaging
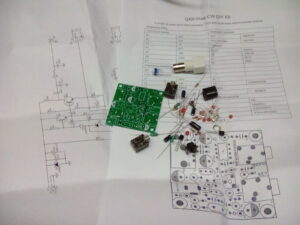
Everything that came in the package. The full schematic, BOM reference, PCB and all the components and connectors.
Pixie II PCB
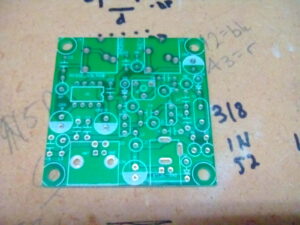
The Pixie II Printed Circuit Board. Component placement is labeled with standard schematic alphanumerics. The included reference sheet is required to know what to put where.
Pixie II conponent placement
Pixie II component placement. Nothing is soldered yet.
Pixie II component placement with SIP socket
Component placement showing the SIP socket used as a crystal socket.

As soon as I opened the kit, I was pretty impressed. I was a little surprised to find a full schematic of the Pixie II and “instructions” included with the kit. Normally, these kits come with just a PCB labeled with values and a bag of parts. The PCB is legit thru hole and small enough for the infamous and much talked about Altoids tin and is clearly labeled to be referenced to the bill of materials sheet that came with it. I can’t wait get on the air with it and I got it just in time for ARRL Field Day!

Homebrew QRP (CW or SSB)

I’ve been getting frustrated trying to find complete/useful information on building a radio from scratch. All of the designs I find are really old and have parts that are hard to find now or are new and really complex. I realize that the transmission standards are higher now, but is there no middle ground? I’m looking for simple with modern and easy to find (read cheap) parts.

It would seem that QRP CW is my answer for now. I’ve found some homebrew QRP SSB, but I’m not sure I’m ready for that. Possibly the best resource I’ve found to this end is qrpme.com. They have lots of cool little QRP rigs and accessories to choose from ranging from about $30 up to about $50. I’m looking at the Lil’ Squall II that’s based on the infamous Pixie II, but with a crystal socket and changeable lowpass filter. It’s still fixed frequency, but you can easily change the crystal and filter and jump to other frequencies or even whole different bands. This kit is so simple and so well documented, that I’m going to attempt to build it from parts that I source myself whether from scavenging from other stuff, my local Hackerspace or ordering from EBay. I’m hoping to keep my cost well below the already inexpensive kit.

I’m also looking at the Rockmite II kits on the qrpme.com site. I will probably end up just ordering one of these kits when I can save up the $50 and justify spending it on a radio.

Another possible solution that recently caught my eye is the Arduino/AD9850 DDS combination that may allow one to build a VFO radio for less than $30. That sounds pretty cool. I’ll have to do some more research on this to see if it’s what I think it is. I’m not really sure what this would be capable of. If it would pick up and send CW, that would be cool enough for me. If it can also be used as part of AM, DSB, SSB or whatever, that would be rad.

Morse Mentor for Android

Slowly but surely in still learning Morse code. I’ve been using lcwo.net, but I’ve discovered that that is really limiting my potential practice time. I haven’t tried many apps, but Morse Mentor seems to offer most of the same features as lcwo. Koch method, Farnsworth timing, etc. I’m working with character speed at 20wpm, but Farnsworth of 5wpm. I’m doing well at that speed, but I know I’ll have to speed it up a lot to get on the air. I hope to be proficient at cw and have a QRP rig built by the time I go to Burning Man this year. Oh and I hope to get my general class ticket!

General Class Ticket

I’m starting to study for my General Class license. I ordered the previous edition of the the Gordon West book from abebooks.com for around $3. With this book and some online sample tests, I think I should be able to pass the test with relative ease. It would be really cool to get to upgrade at Burning Man this year since I got my tech just last year. When I started trying to do anything with ham radio, I didn’t think I’d be able to even consider an upgrade in just a year. Now it looks like a pretty reasonable expectation.

CW is difficult for me

I’m using lcwo.net, but I’m having real trouble copying at 20 WPM characters with 5 WPM spacing (effective 10 WPM). I think part of the problem is that I have trouble recovering when I miss a character. I just kind of spaz out. Now, I haven’t been sticking with any schedule let alone daily practice, but I’m determined to get it. I really need an HF receiver and antenna so I can listen to other beginners.

Simple LM386 Op Amp

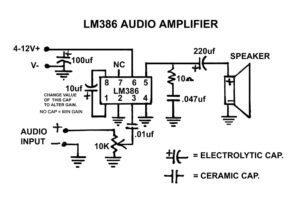
I’ve been wanting to build myself a little amp for my phone, mp3 player, etc. for awhile. Originally, I wanted to build something completely from discrete components but finally gave into using the LM386 IC. The datasheet is very helpful and even includes several circuits to try out. It’s a very simple circuit to get the little amp built and working, but I kept having trouble with terrible distortion rendering the amp unusable. I kept tinkering, troubleshooting, researching, and so on, only to discover that one of the power rails on my breadboard is bad. Lame. Once I figured that out, then the circuit really is simple! You can find variations of this circuit all over the internet, but I ended up using the circuit from Dino over at Hack A Week. This guy is pretty awesome and has very informative and entertaining instructional videos. His circuit and BOM is listed below.

  • Enclosure of your choice
  • 10 ohm resistor
  • 10K potentiometer
  • 220 uf polarized capacitor
  • 100 uf polarized capacitor
  • 10 uf polarized capacitor
  • .01 uf ceramic capacitor
  • .047uf ceramic capacitor
  • 2x 1/8″ mini audio jacks
  • 2x 1/4″ audio jacks
  • 9 volt battery clip
  • 9 volt battery
  • small perforated circuit board
  • Some hookup wire
  • A speaker of your choice for output.
LM386 Op Amp from Hack A Week

A lot of the discrete parts for this project I salvaged from various things. I used my little LEXPON Multifunction Transistor Tester to test my components and to double check values on the capacitors. Dino’s BOM for the project is for a finished device, but you can skip a bunch of the items to just build it on a breadboard and get it working. I had a 10k pot with a built in on/off switch that I used and I also wired in a little LED to remind me to turn off the circuit and not run down the battery. Using a salvaged 1w speaker plugged directly into the circuit on the breadboard, I got pretty clear audio from the output on my laptop. It’s always exciting to get stuff like this to work no matter how simple. Now to do something useful with it…

The Hackey Iambic Key

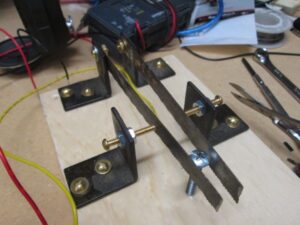
This is the homebrew iambic key, Hackey,  origianally from N4SER.
This is the homebrew iambic key, Hackey, originally from N4SER.

Hackey Parts list:

  • old hacksaw blade (duh)
  • 4x corner brackets
  • 2x 1″ 6-32 machine screws
  • 2x 1/2″ 6-32 machine screws
  • 6x 6-32 nuts
  • 8x #6 1/2″ wood screws
  • a screw that is the height of the hacksaw blades
  • some wire
  • 3.5mm audio jack

On my quest for a better understanding of the hardware involved with learning CW, I started finding come cool homebrew keys. The one that really stuck out for me was The Hackey. It not only shows how simple a key can be, but it’s made from found stuff. Perfect!

The center post/screw is the common ground and the 2 halves of the hacksaw blade are the contacts. The long screws toward the front adjust the distance of action and the screws in the back just hold the contacts in place and connect the dit and dah wires.

This is a simple, fun and satisfying afternoon project.